My 2026 Homelab Architecture — Part 1: The Infrastructure
My homelab infrastructure — UDM SE, pfSense, 7-node Proxmox cluster, ~37TB NAS storage, PiKVM management, and APC UPS power protection.
Why a Homelab?#
Ten years ago, I started with a Raspberry Pi just to run a Nextcloud and some Docker containers. It was a simple playground — a place to learn Linux and self-hosting without worrying about breaking anything important.
Since then, things have grown a lot. That single device has turned into 5+ Proxmox nodes with dedicated storage, NAS, a strong firewall, and more services than I can count. My setup now includes a UDM SE and a custom pfSense router, both managing several network segments. But the main idea is still the same: learn by doing, keep control of your data, and avoid depending on companies that might change their terms or go away.
There’s a big privacy aspect to it, too. I prefer hosting daily-use tools instead of paying a large subscription fee for a service when open-source alternatives are available, and I like knowing exactly where my data lives and who has access to it.
This post is Part 1 of a three-part series about my full homelab setup:
Part 1 (this post): The complete infrastructure — networking, compute, storage, remote management, and power.
Part 2: Services & Apps — every VM, LXC, and container running across the homelab.
Part 3: Operations & Plans — backup strategy, observability stack, deployment automation, and 2026 roadmap.
Whether you’re just starting your first lab or looking for ideas to upgrade your current one, I hope you find this useful. Let’s start with the network, because if the foundation isn’t solid, nothing else works.
Full Inventory at a Glance#
| Category | Devices |
|---|---|
| Gateway | UniFi Dream Machine SE (UDM SE) |
| Firewall | pfSense on G1 Thin Client (Intel J4125, 4x LAN) |
| WiFi | Netgear R7800 Nighthawk |
| Switches | Netgear GS308P (PoE), TP-Link SG108E, Netgear GS308T |
| Compute | 7x Proxmox nodes — 200GB+ RAM, 40+ cores |
| Storage | Unraid, Synology DS18+, TrueNAS, HL-TrueNAS (VM) — ~37TB raw |
| Management | 2x PiKVM (Geekworm KVM-A3 + Geekworm X651 PCIe) |
| Power | APC UPS PRO 1000VA + APC UPS PRO 1500VA |
| Desktops | Mac Air M3 (macOS), Dell Optiplex (NixOS) |
Network#
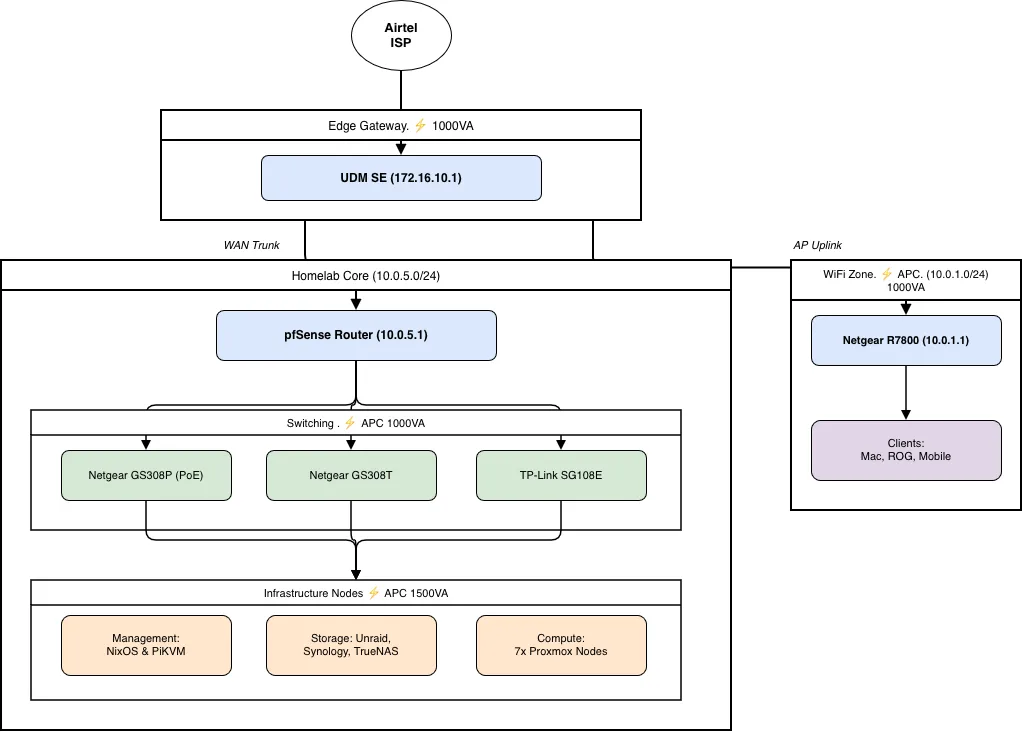
The network is split into three distinct segments, each with its own subnet and purpose:
| Subnet | Gateway | Purpose | Router/Gateway |
|---|---|---|---|
| 172.16.10.0/24 | 172.16.10.1 | Edge / WAN-facing | UDM SE |
| 10.0.5.0/24 | 10.0.5.1 | Homelab (servers & NAS) | pfSense |
| 10.0.1.0/24 | 10.0.1.1 | WiFi (Homelab & Guest) | Netgear R7800 |
The reasoning behind three segments:
- Isolation: homelab traffic stays separate from daily browsing.
- Security: pfSense enforces detailed firewall rules just for the lab segment.
- Performance: smaller broadcast domains keep NAS traffic from affecting WiFi.
Network Topology#
Airtel ISP
    │
    ▼
UDM SE (172.16.10.1)
    ├──── pfSense WAN (172.16.10.183)
    │         │
    │         ▼ LAN (10.0.5.1)
    │         ├── Netgear GS308P (PoE)
    │         │     ├── PiKVM KVM-A3  (→ Unraid)
    │         │     └── PiKVM X651    (→ pve1)
    │         ├── TP-Link SG108E
    │         │     ├── Proxmox nodes
    │         │     └── NAS devices
    │         ├── Netgear GS308T
    │         │     ├── Proxmox nodes
    │         │     └── NAS devices
    │         └── NixOS Dell Optiplex
    │
    └──── Netgear R7800 (10.0.1.1)
              └── Mobile phones & other WiFi devices
Now let’s walk through each layer, starting from the edge.
The Edge: UDM SE#
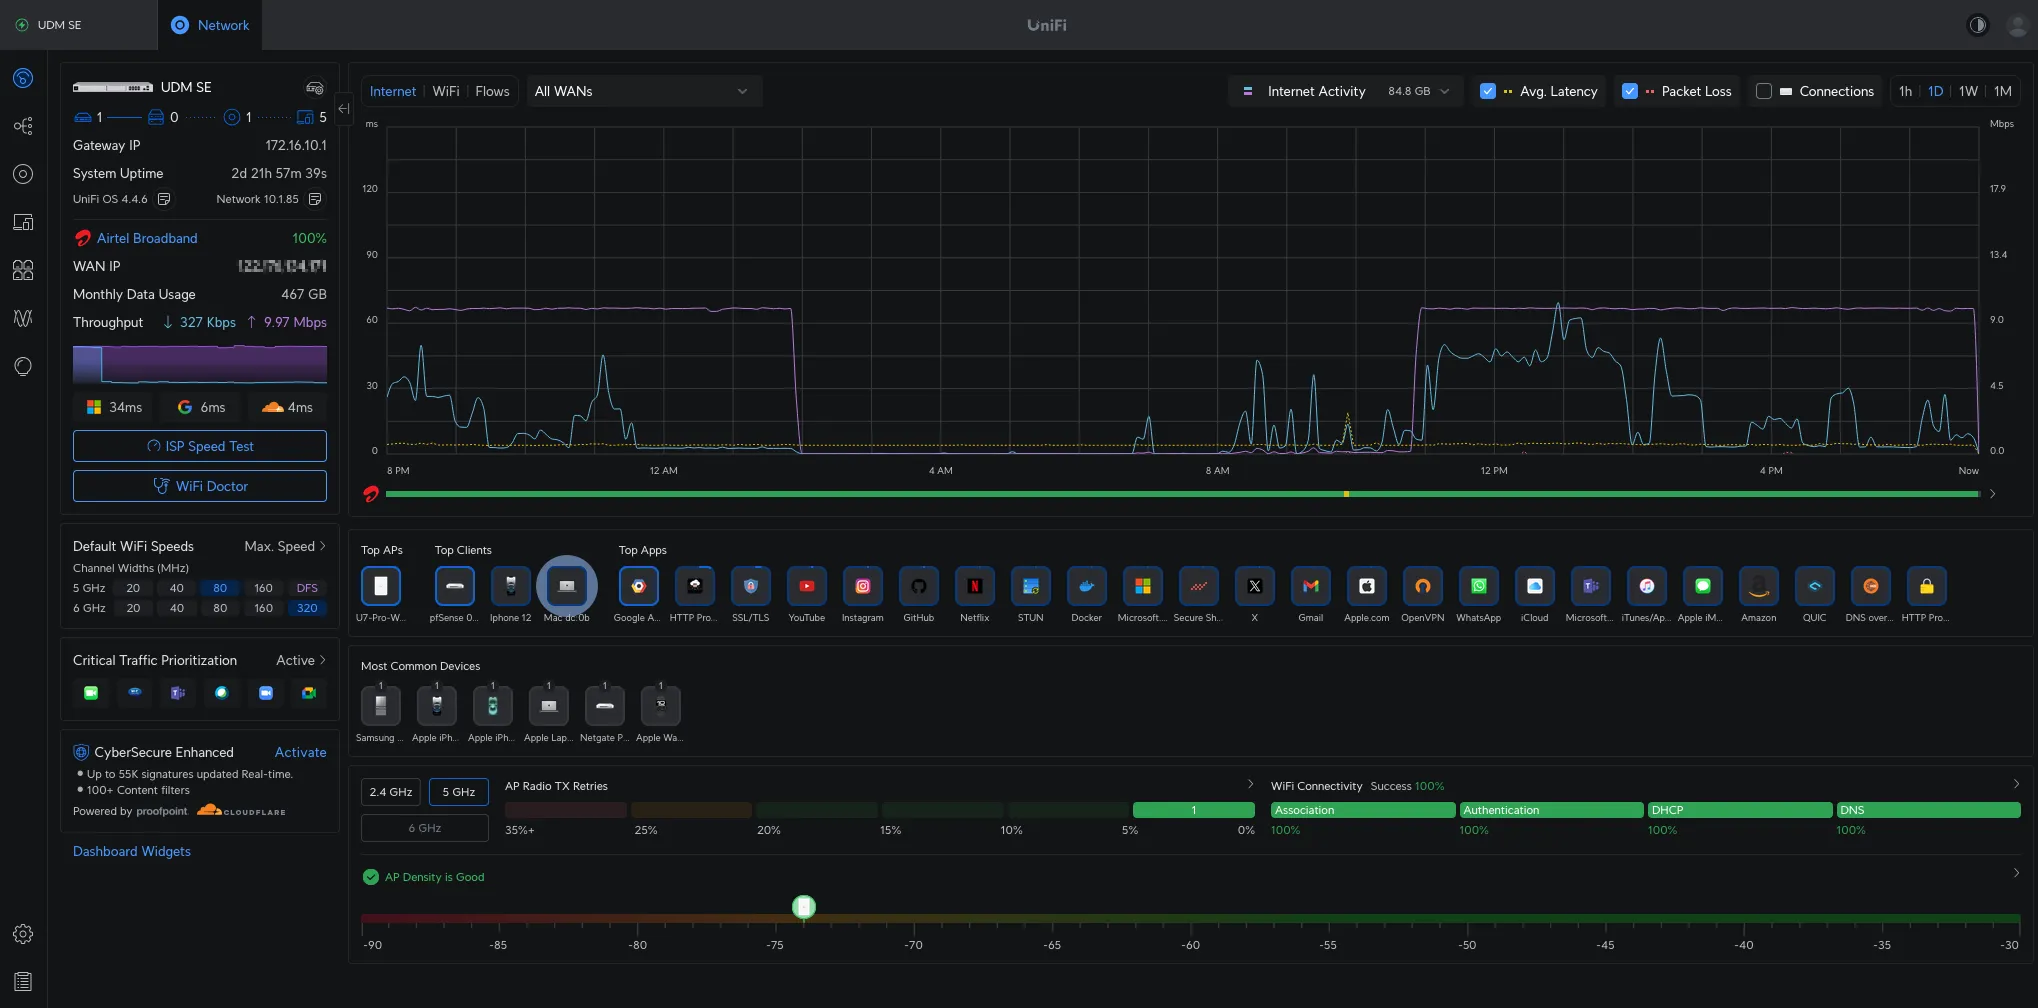
The UniFi Dream Machine SE is the first device that connects to the internet. Everything that enters or leaves my network goes through it. I chose the UDM SE because it offers the right balance: it is enterprise-grade inside, but still simple to set up without needing deep networking knowledge. The built-in UniFi controller means I do not need a separate management VM, and the hardware is reliable for continuous use.
Beyond basic routing, the UDM SE handles two additional responsibilities:
- WireGuard VPN — runs directly on the UDM SE for quick remote access (details in the VPN section below).
- NextDNS — all DNS queries are routed through NextDNS for network-wide ad blocking (details in the DNS section below).
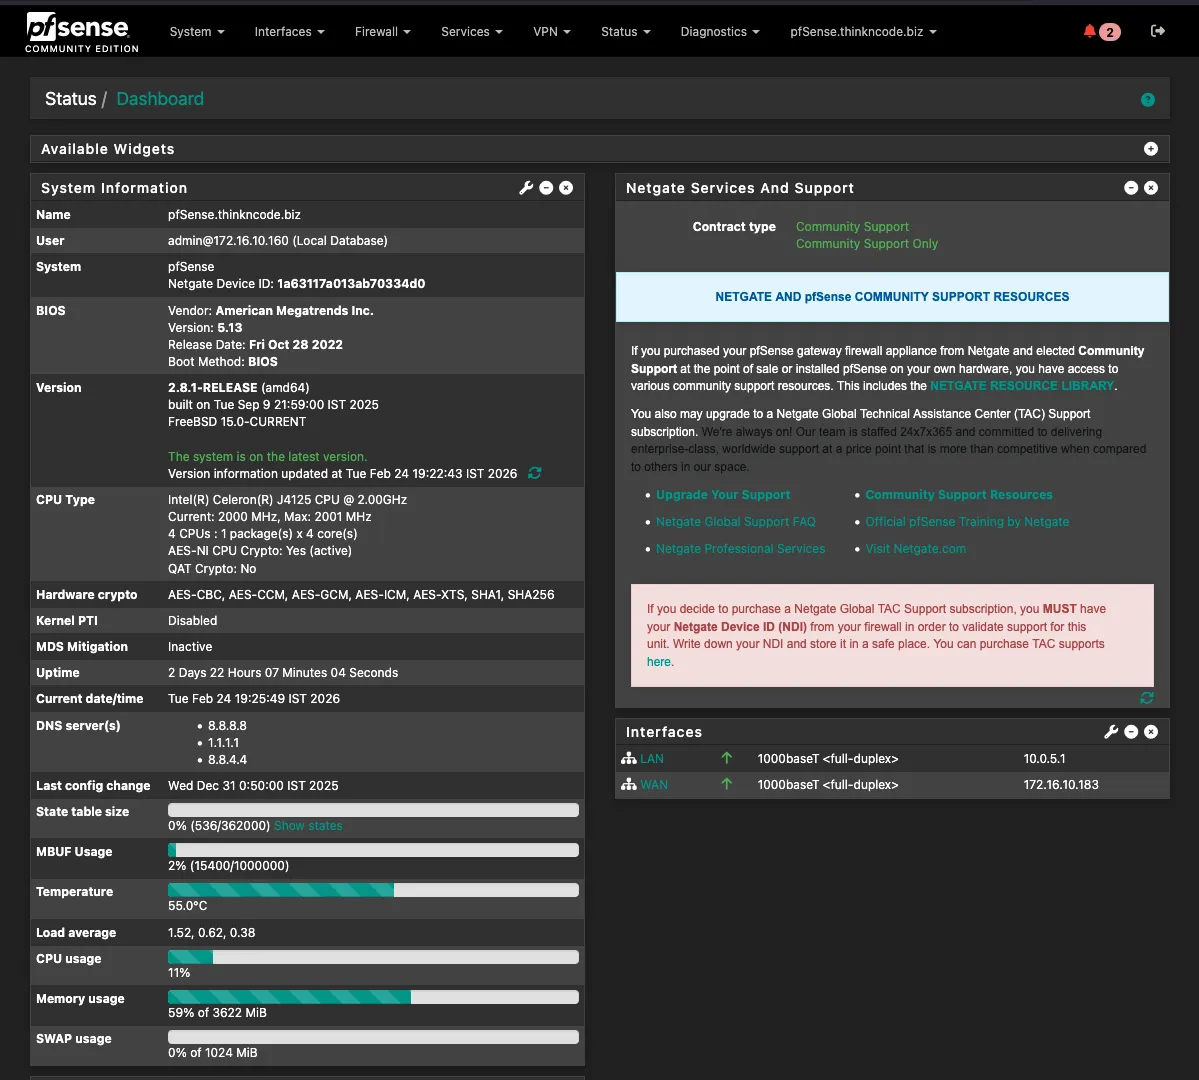
Firewall & Router: pfSense#
The brain of the homelab network runs on a repurposed thin client:
| Component | Specification |
|---|---|
| Device | G1 Thin Client PC (4x LAN Mini PC) — Used/Barebone |
| CPU | Intel Celeron J4125 @ 2.00 GHz (4 cores) |
| AES-NI | Yes (hardware crypto acceleration) |
| Storage | 120 GB |
| LAN Ports | 4x Gigabit Ethernet |
While the UDM SE handles edge-level routing, pfSense is where the homelab’s network rules actually live. Here, it segments the lab from the client network, enforces service-level firewall policies, and runs several packages that would be too heavyweight for the UDM SE, creating a clearer division of network responsibilities.
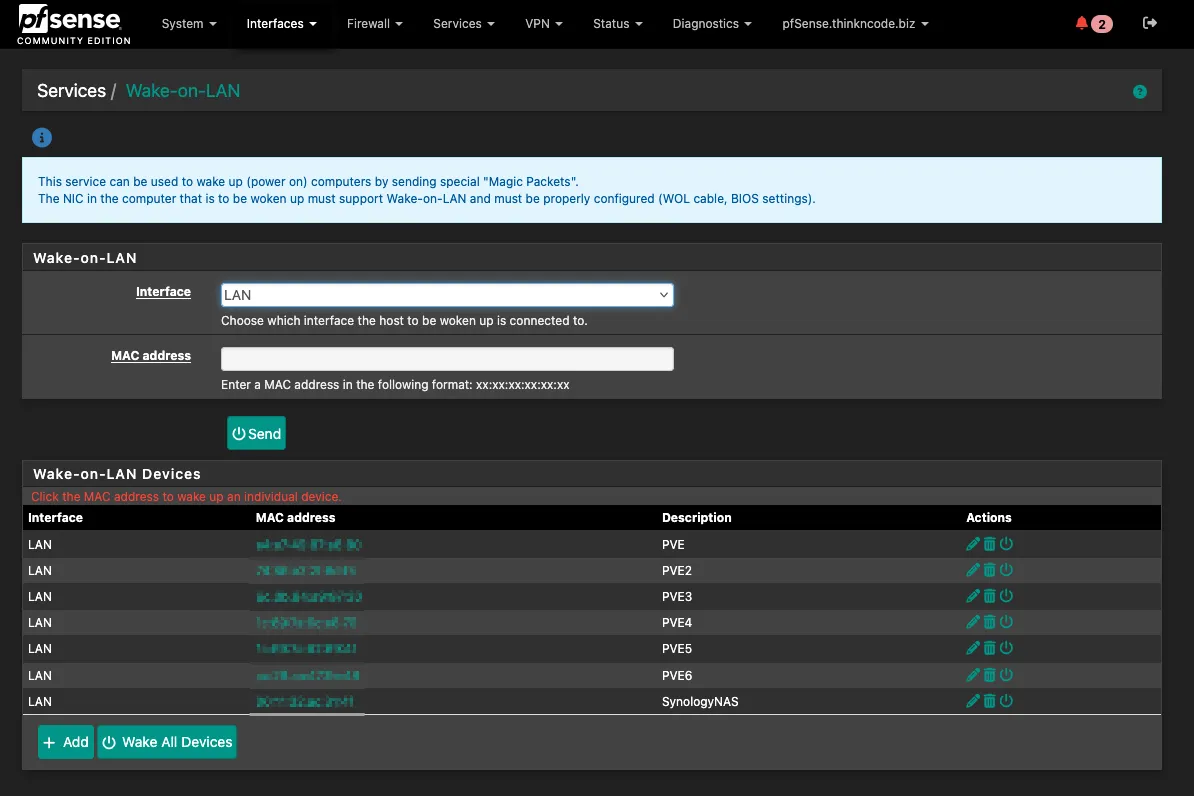
Packages running on pfSense:
| Package | Purpose |
|---|---|
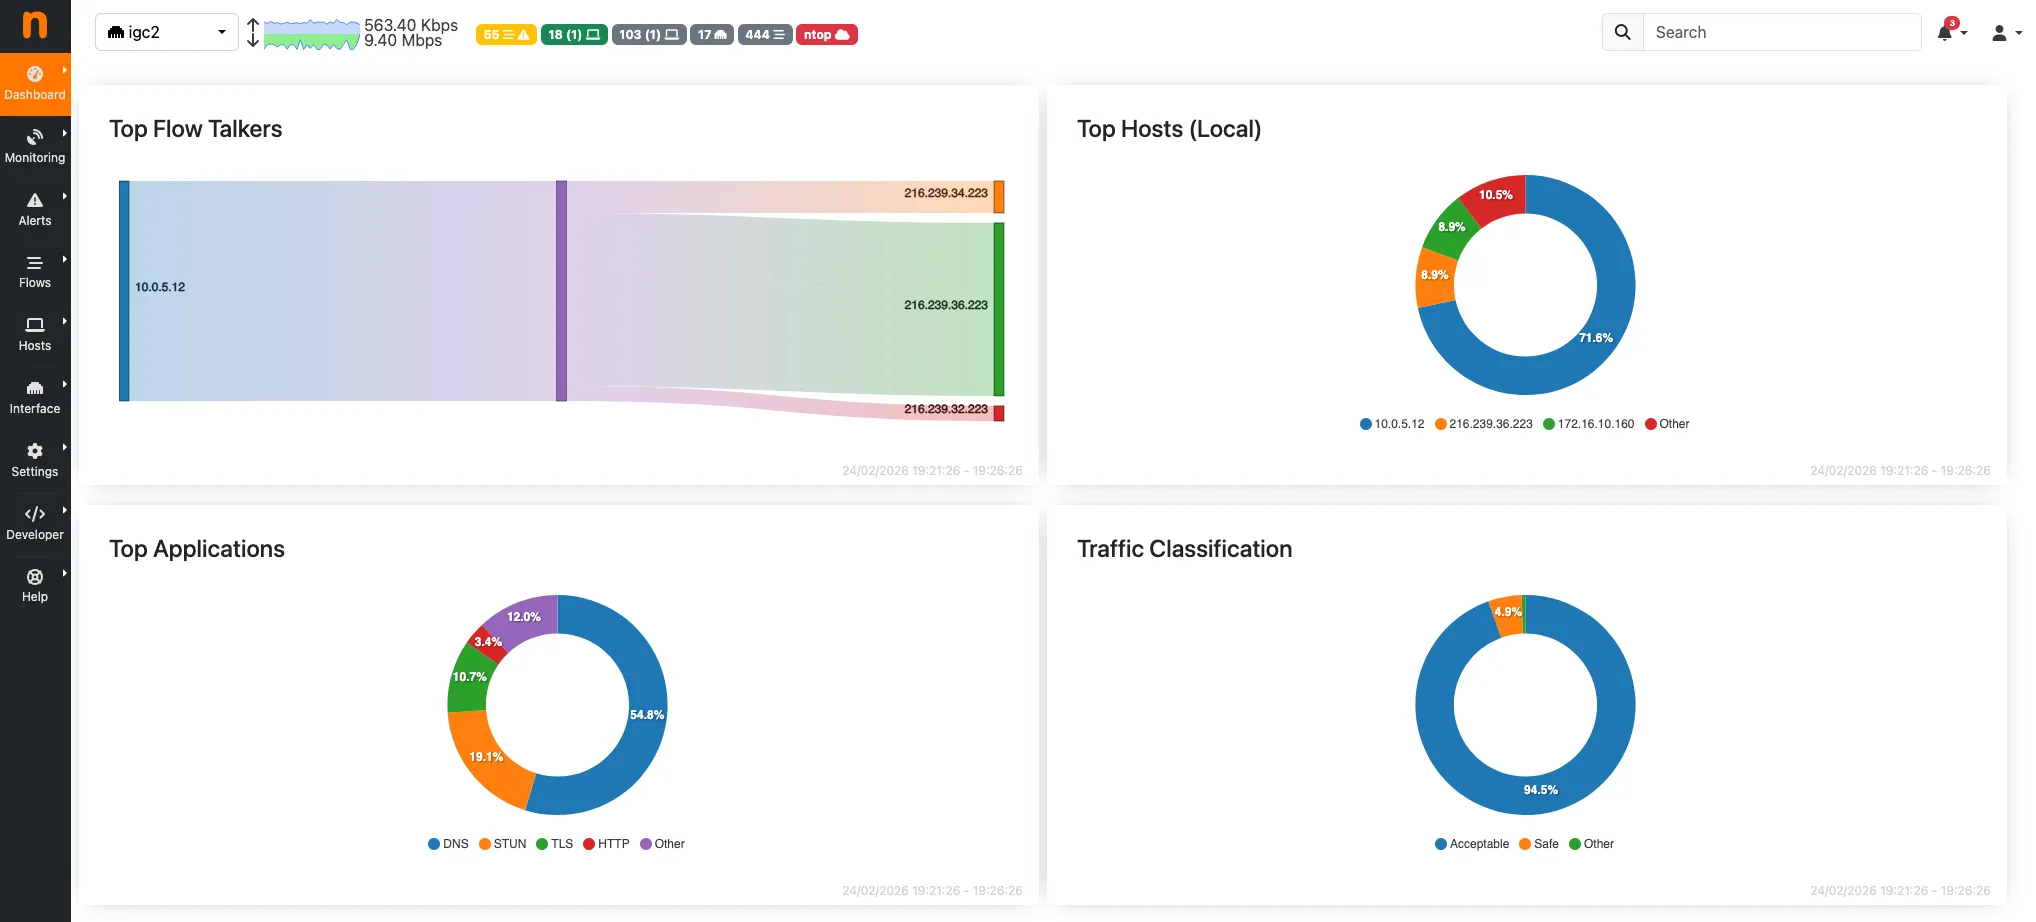
| ntopng | Real-time traffic analysis — top talkers, bandwidth per host, per service |
| Wake-on-LAN | Remotely power on servers that are shut down without being physically present |
| Netbird | Mesh VPN client — connects pfSense as a peer so all homelab devices are accessible via the Netbird network |
VPN Strategy#
Three tools cover remote access and service exposure, each with a distinct role:
| Tool | Hosted On | Purpose |
|---|---|---|
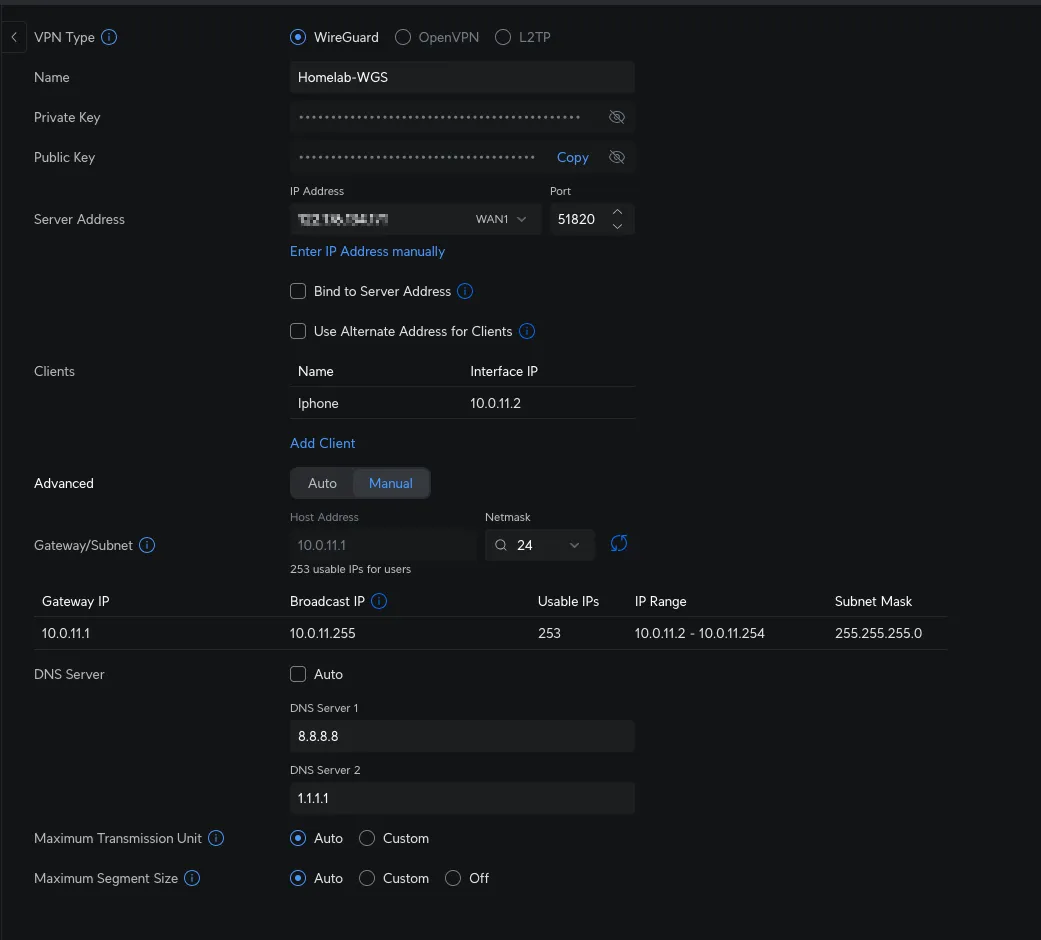
| WireGuard | UDM SE | Quick remote access — connect phone or laptop directly into the network |
| Netbird | Hetzner VPS | Self-hosted mesh VPN — peer-to-peer overlay across all lab devices |
| Pangolin | Hetzner VPS (same) | Expose internal services remotely via reverse tunnel, no open ports needed |
WireGuard on UDM SE covers quick remote access. When an external connection is needed, WireGuard is enabled on a phone or laptop, providing direct access to both the homelab and the client segment. This approach is fast and avoids external dependencies.
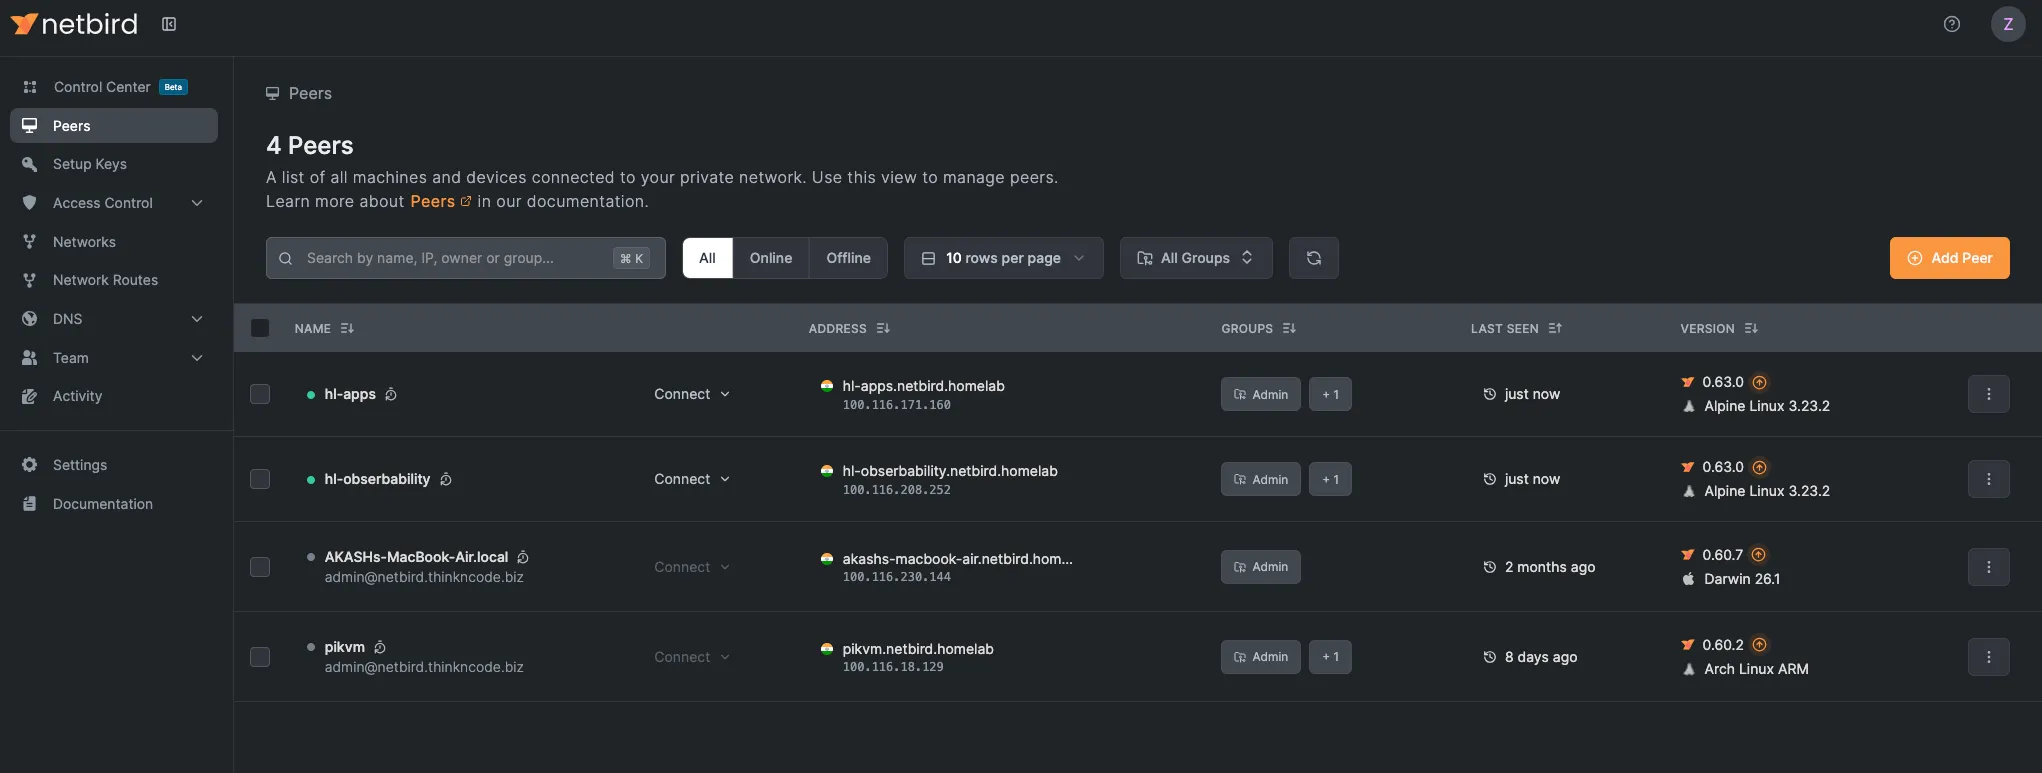
Netbird is a self-hosted, open-source WireGuard-based mesh VPN. Unlike the hub-and-spoke model, each device running the Netbird agent is a peer. The management server runs on a Hetzner VPS. pfSense runs the Netbird client and exposes the 10.0.5.0/24 homelab subnet, so any peer can reach homelab devices as if they were local, even if the home network is unreachable.
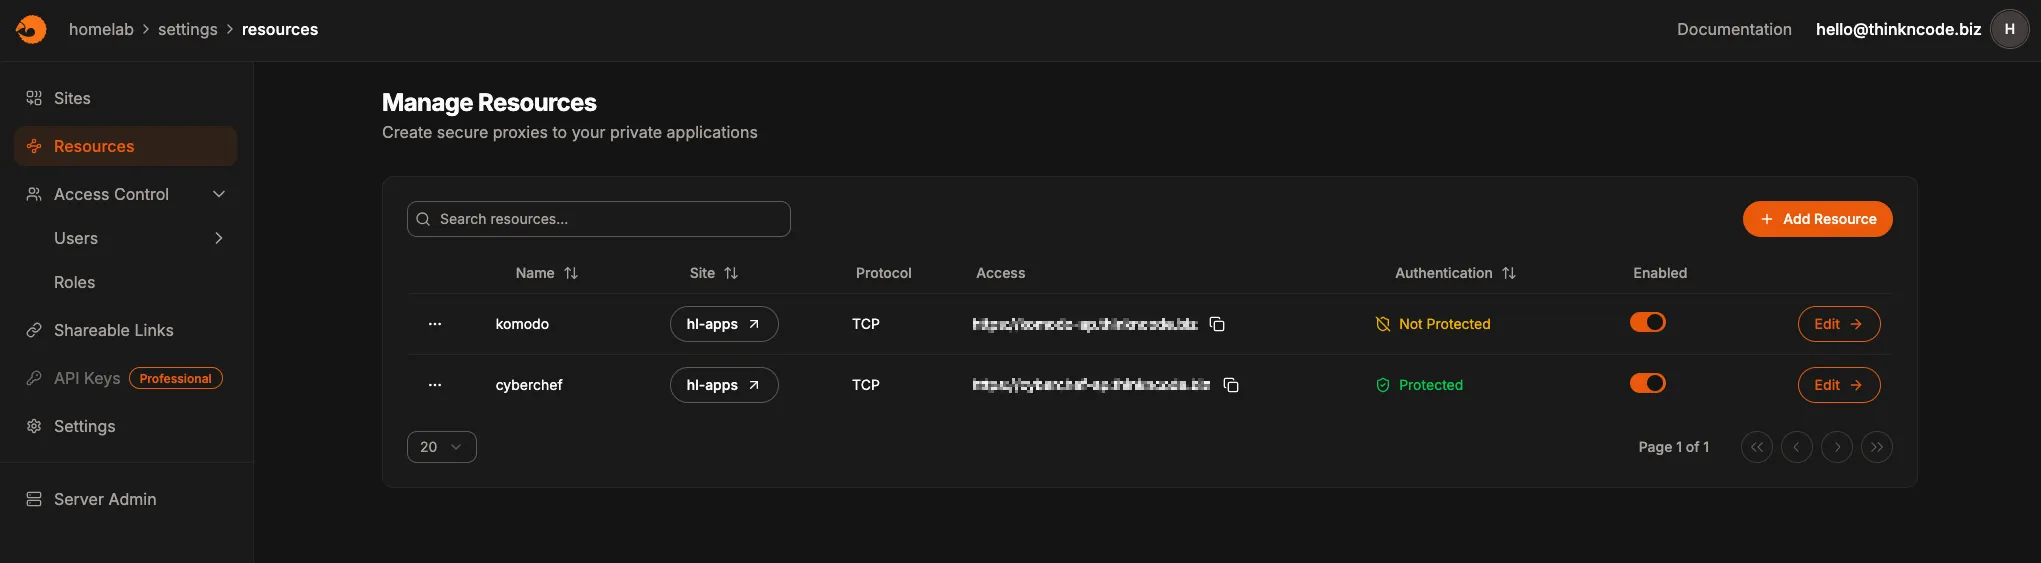
Pangolin runs on the same Hetzner VPS as Netbird. It is a reverse proxy, so services inside the homelab can be exposed externally via Pangolin without opening firewall ports or a public IP address. It is a self-hosted alternative to Cloudflare Tunnel, giving full control over the relay server.
DNS#
DNS splits into two concerns: ad blocking at the network level and service name resolution for all homelab services.
Ad blocking — NextDNS on UDM SE
All DNS queries from every device on both segments flow through NextDNS, configured directly on the UDM SE. This gives network-wide filtering without managing a local resolver. Block lists, allow lists, and query logs are all managed in the NextDNS dashboard.

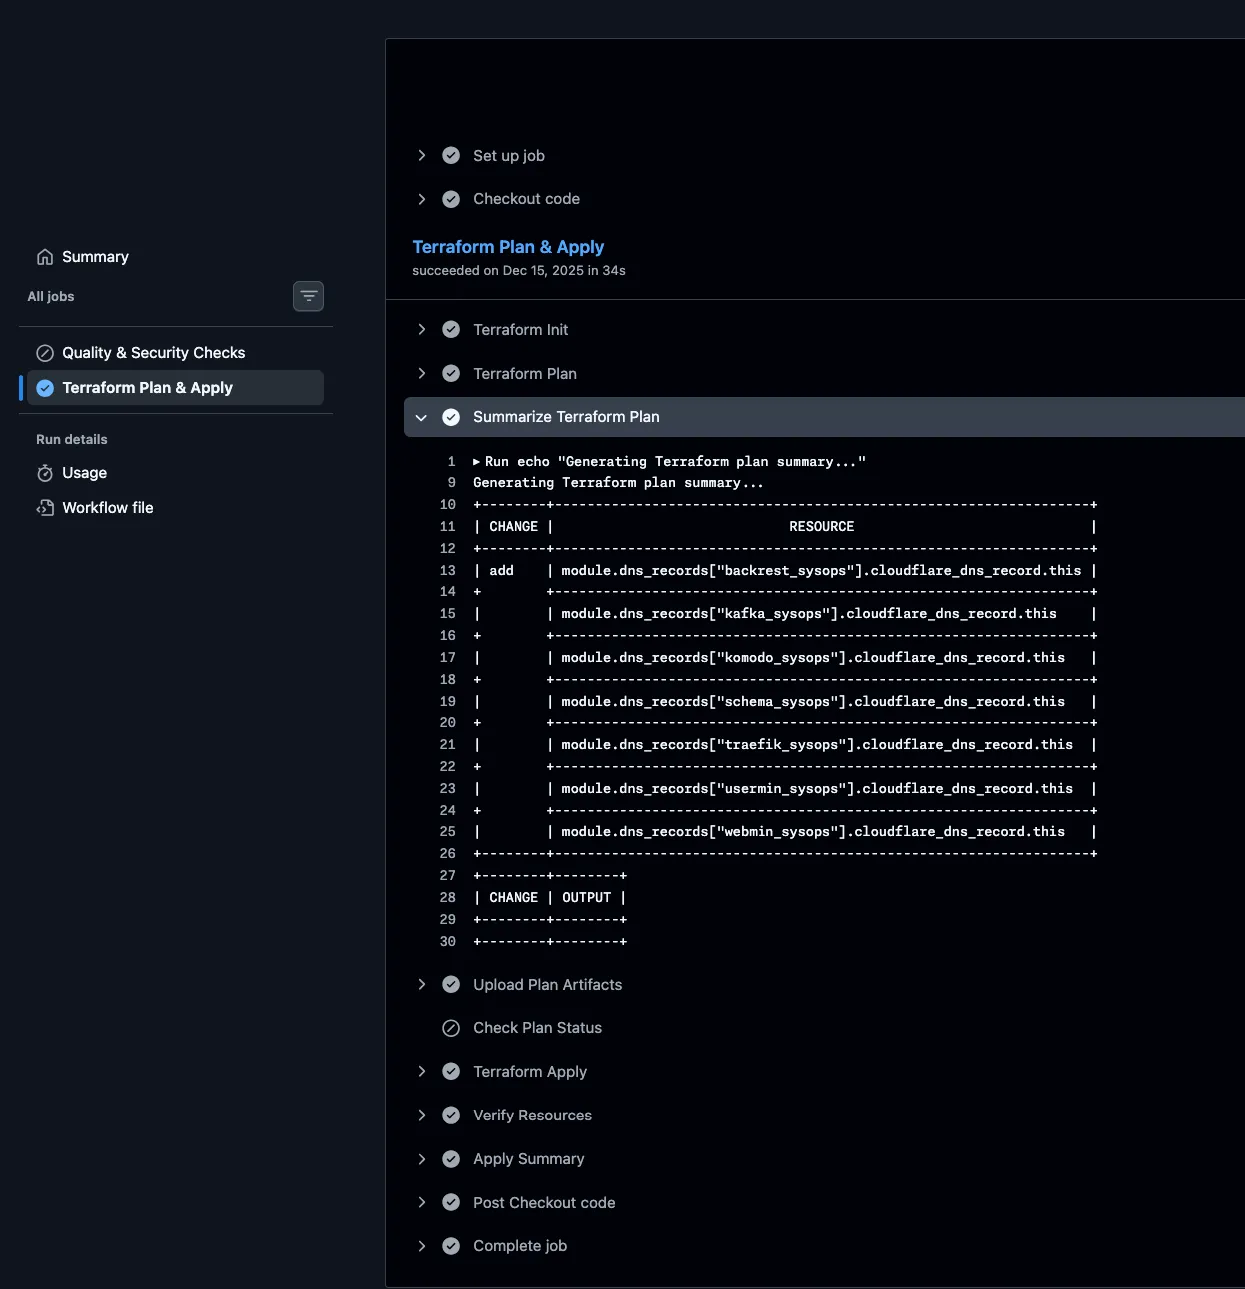
Service DNS: Cloudflare, Terraform, and GitHub Actions
All homelab services use the *.thinkncode.biz domain, which is managed with Cloudflare. Instead of manually modifying records, DNS is treated as code—every DNS record is defined in Terraform. A dedicated GitHub Actions pipeline manages Terraform with Cloudflare bucket storage, automatically adding or removing records as services are deployed or retired.
Switching Layer#
Below pfSense, three switches distribute connectivity to all homelab devices:
| Switch | Ports | Type | Role |
|---|---|---|---|
| Netgear GS308P-100NAS | 8 | Unmanaged (PoE) | Powers PiKVM units and other PoE devices |
| TP-Link TL-SG108E | 8 | Easy Smart | General homelab connectivity |
| Netgear GS308T (Smart Managed Pro) | 8 | Smart Managed Pro | VLAN-capable, managed devices |
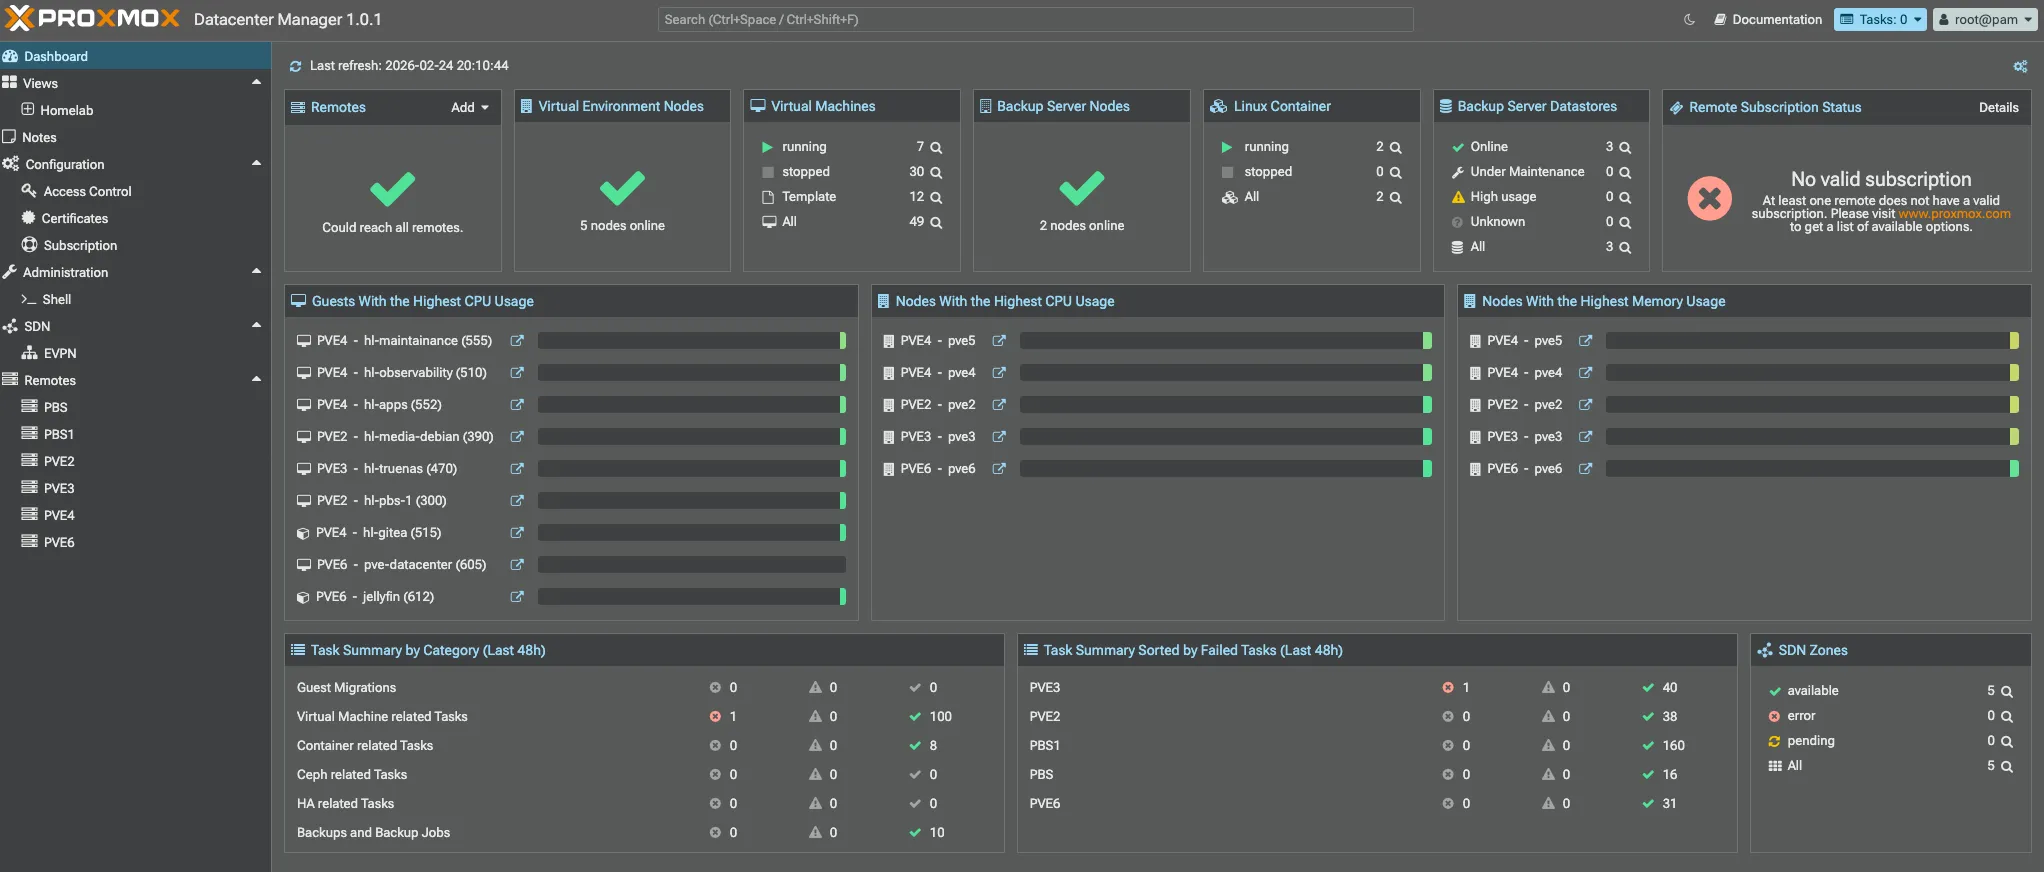
Compute: Proxmox Nodes#
Below are the compute nodes. Every Proxmox instance runs in standalone mode for better manageability, except for pve4 and pve5, which are clustered together since both are NUCs and use little power.
- Each PVE node uses OAuth authentication based on pocket passkeys.
- A Cloudflare-based ACME provider is used to automatically fetch and renew certificates.
- Ubuntu/Debian VM-like templates have been created for easy provisioning.
- LVM-thin based storage is used to manage VM disks.
In Part 2, I’ll do a deep dive into each PVE node, covering the VMs, LXCs, and services I run on my Proxmox setup.
| Node | Device | CPU | RAM | GPU | Storage |
|---|---|---|---|---|---|
| pve | HP Notebook | i3 (7th gen) | 16GB | — | 120GB + 1TB |
| pve1 | Custom Build | i5-9600K | 32GB | GTX 1650 Super | 240GB + 500GB |
| pve2 | Dell Vostro | i3 (12th gen) | 32GB | — | 500GB + 1TB |
| pve3 | Lenovo P510 | Xeon E5-2680v4 | 48GB | — | 240GB + 500GB |
| pve4 | NUC 10i3FNH | i3 (10th gen) | 16GB | — | 120GB + 500GB |
| pve5 | NUC 8i5BEH | i5 (8th gen) | 32GB | — | 240GB + 500GB |
| pve6 | ASUS PL64 | i5 (12th gen) | 32GB | — | 500GB |
Totals: 200GB+ RAM · 40+ CPU cores · GTX 1650 Super for GPU workloads
Node Roles#
| Node | Primary Role | Key Workloads |
|---|---|---|
| pve | Backup & lightweight VMs | PBS2 VM, hl-docker VM (upsnap, portracker, NetbootXYZ) |
| pve1 | GPU & Windows workloads | Windows VM (GPU passthrough), gaming, POC machines |
| pve2 | General-purpose workhorse | hl-media VM, PBS1, K8s cluster, pfSense testing VM, POC machines |
| pve3 | Heavy compute & storage | HL-TrueNAS VM, 3-node Talos cluster, POC machines |
| pve4 | Always-on low-power services | Gitea LXC, hl-observability VM |
| pve5 | Self-hosted apps | hl-apps VM, hl-maintenance VM, hl-k8s-02, NixOS/POC machines |
| pve6 | Media & transcoding | Jellyfin LXC, Talos K8s cluster, PVE Datacenter, NixOS/POC machines |
Storage#
I use four NAS devices, each with a specific role in my storage setup:
| NAS | Role | Raw Capacity | Notes |
|---|---|---|---|
| Unraid | Docker host + storage | ~9TB | NFS/SMB + PBS VM |
| Synology | Offsite backup target | ~8TB | Secondary copy |
| TrueNAS | Offsite backup target | ~8TB | ZFS replication target |
| HL-TrueNAS | Bulk VM storage (VM on pve3) | ~12TB | 10TB WD UltraStar |
| Total | ~37TB raw |
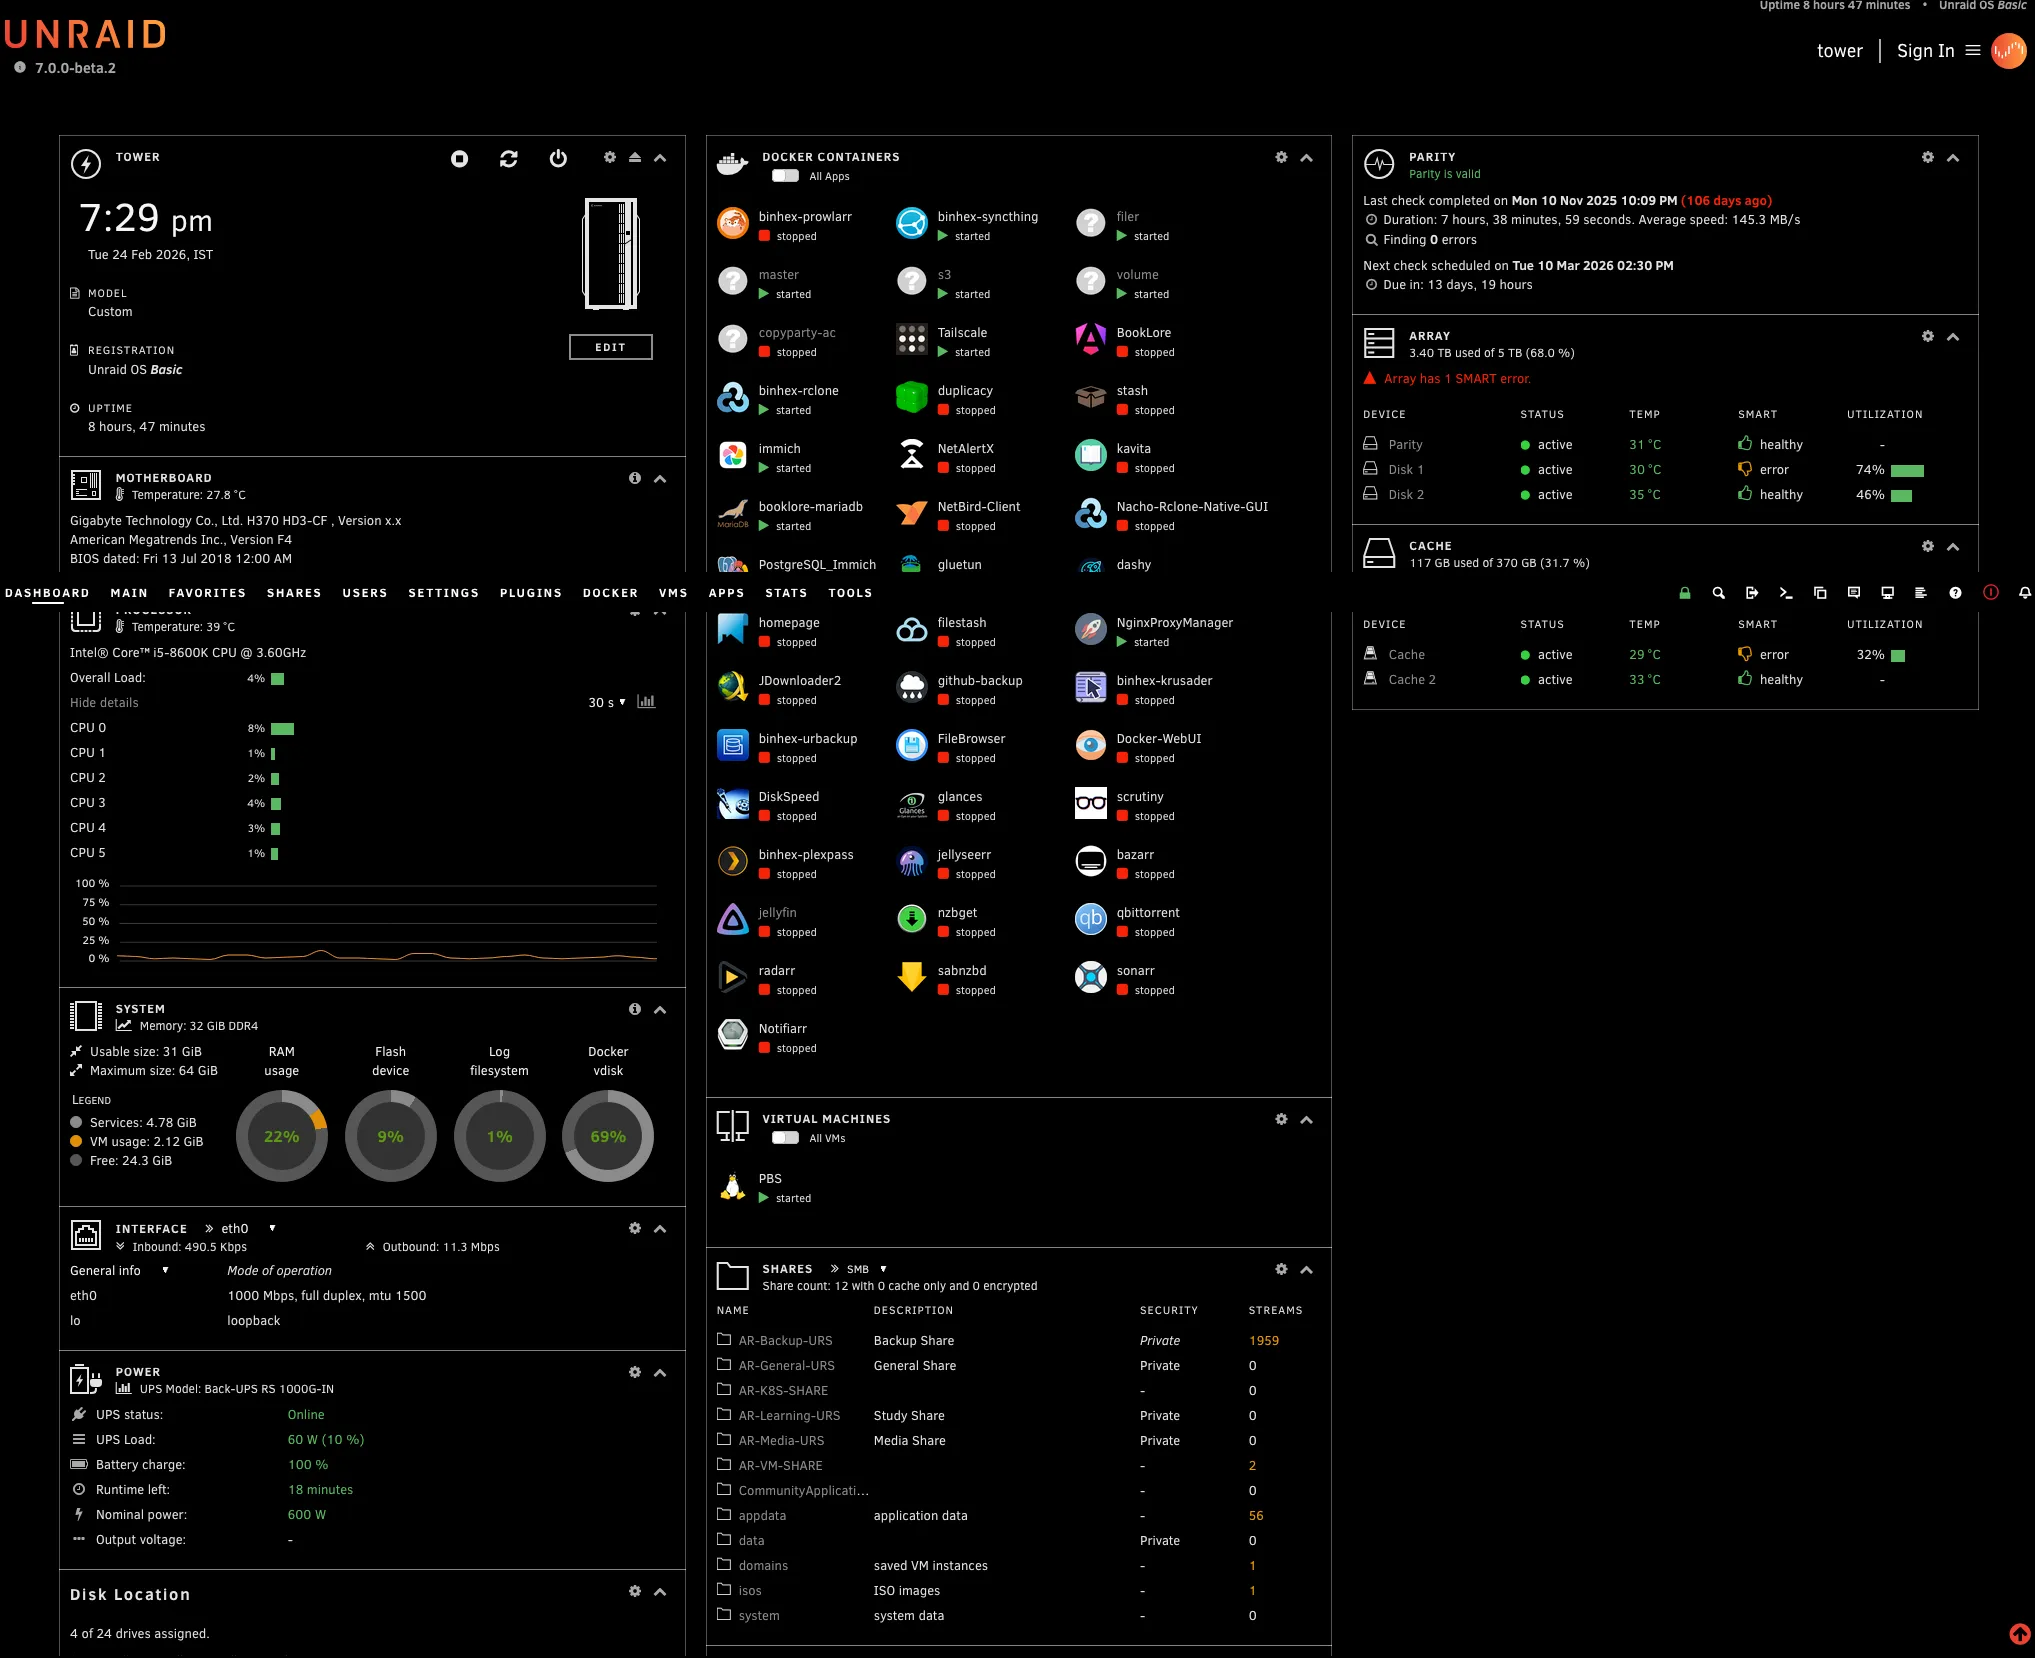
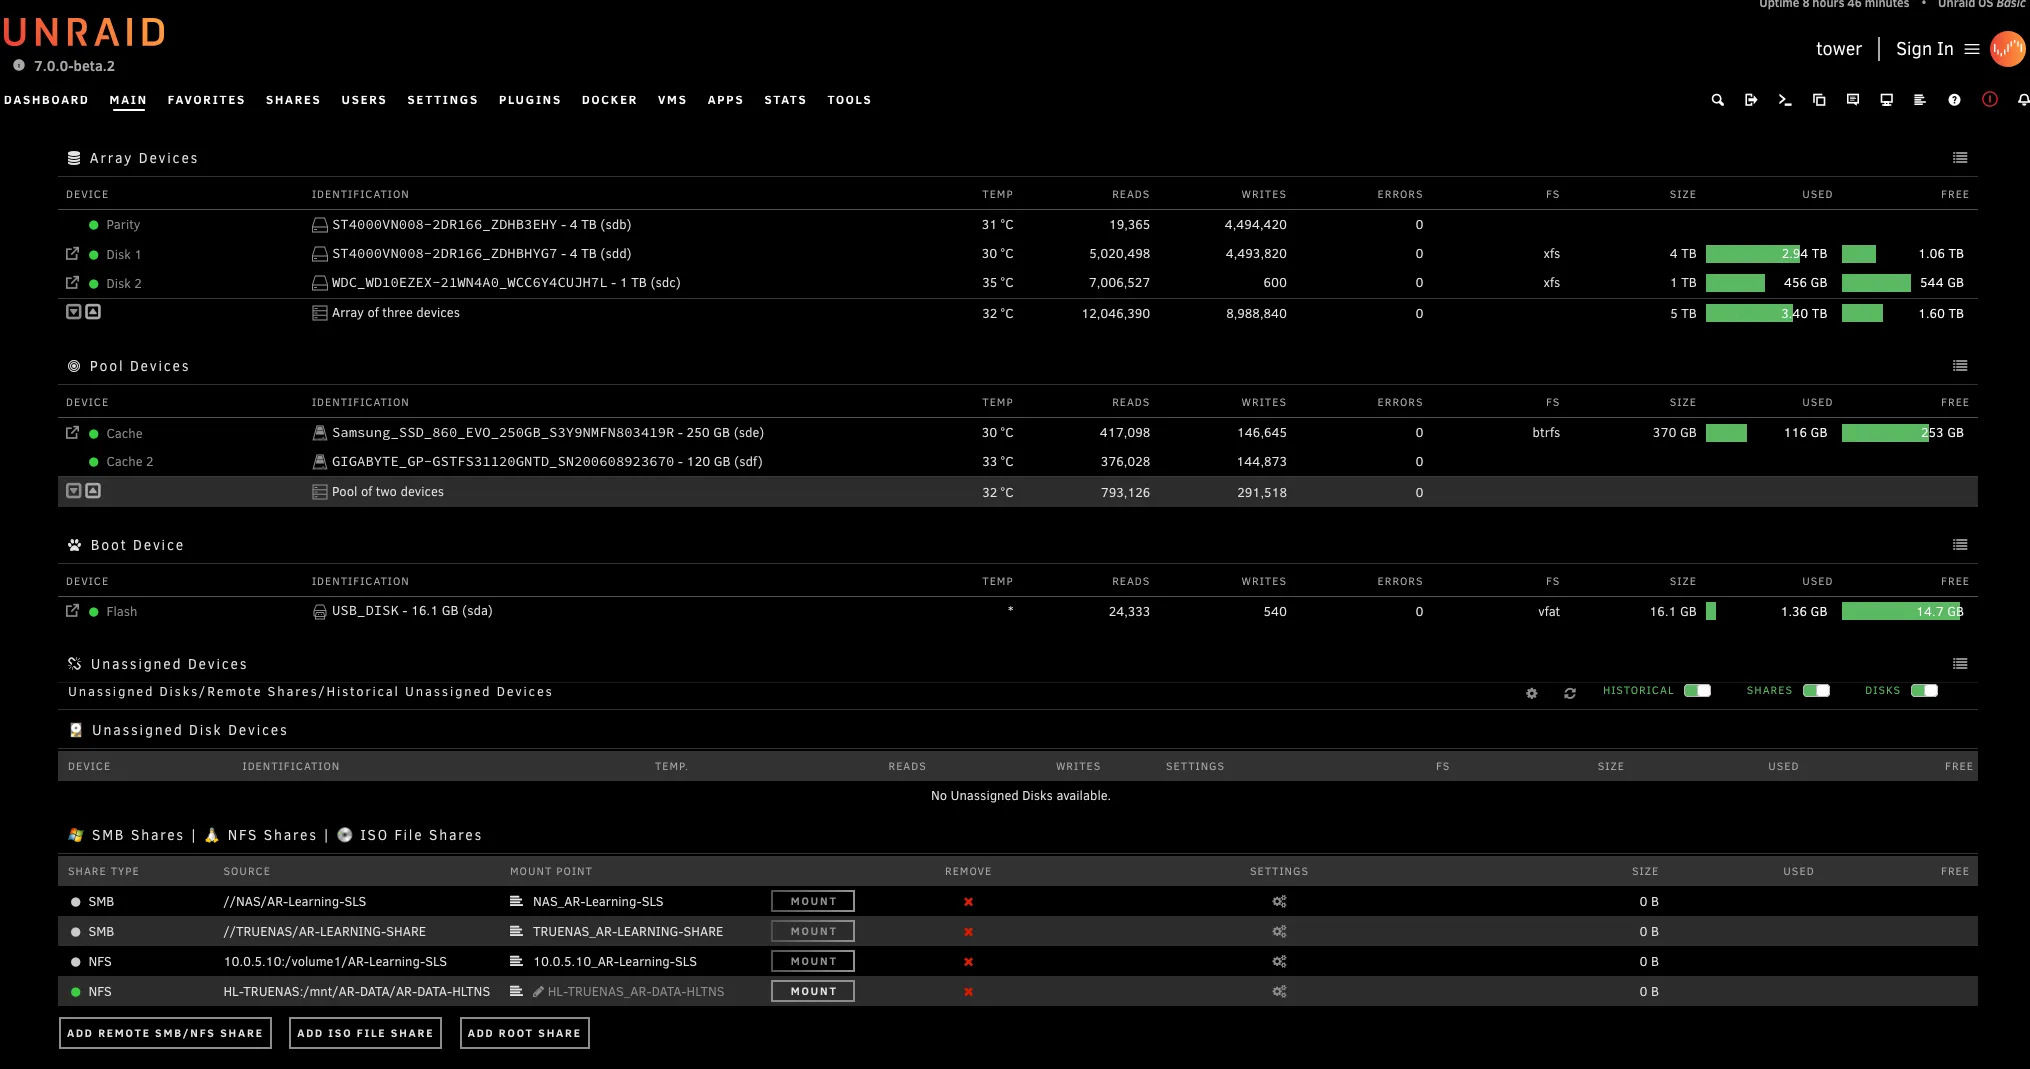
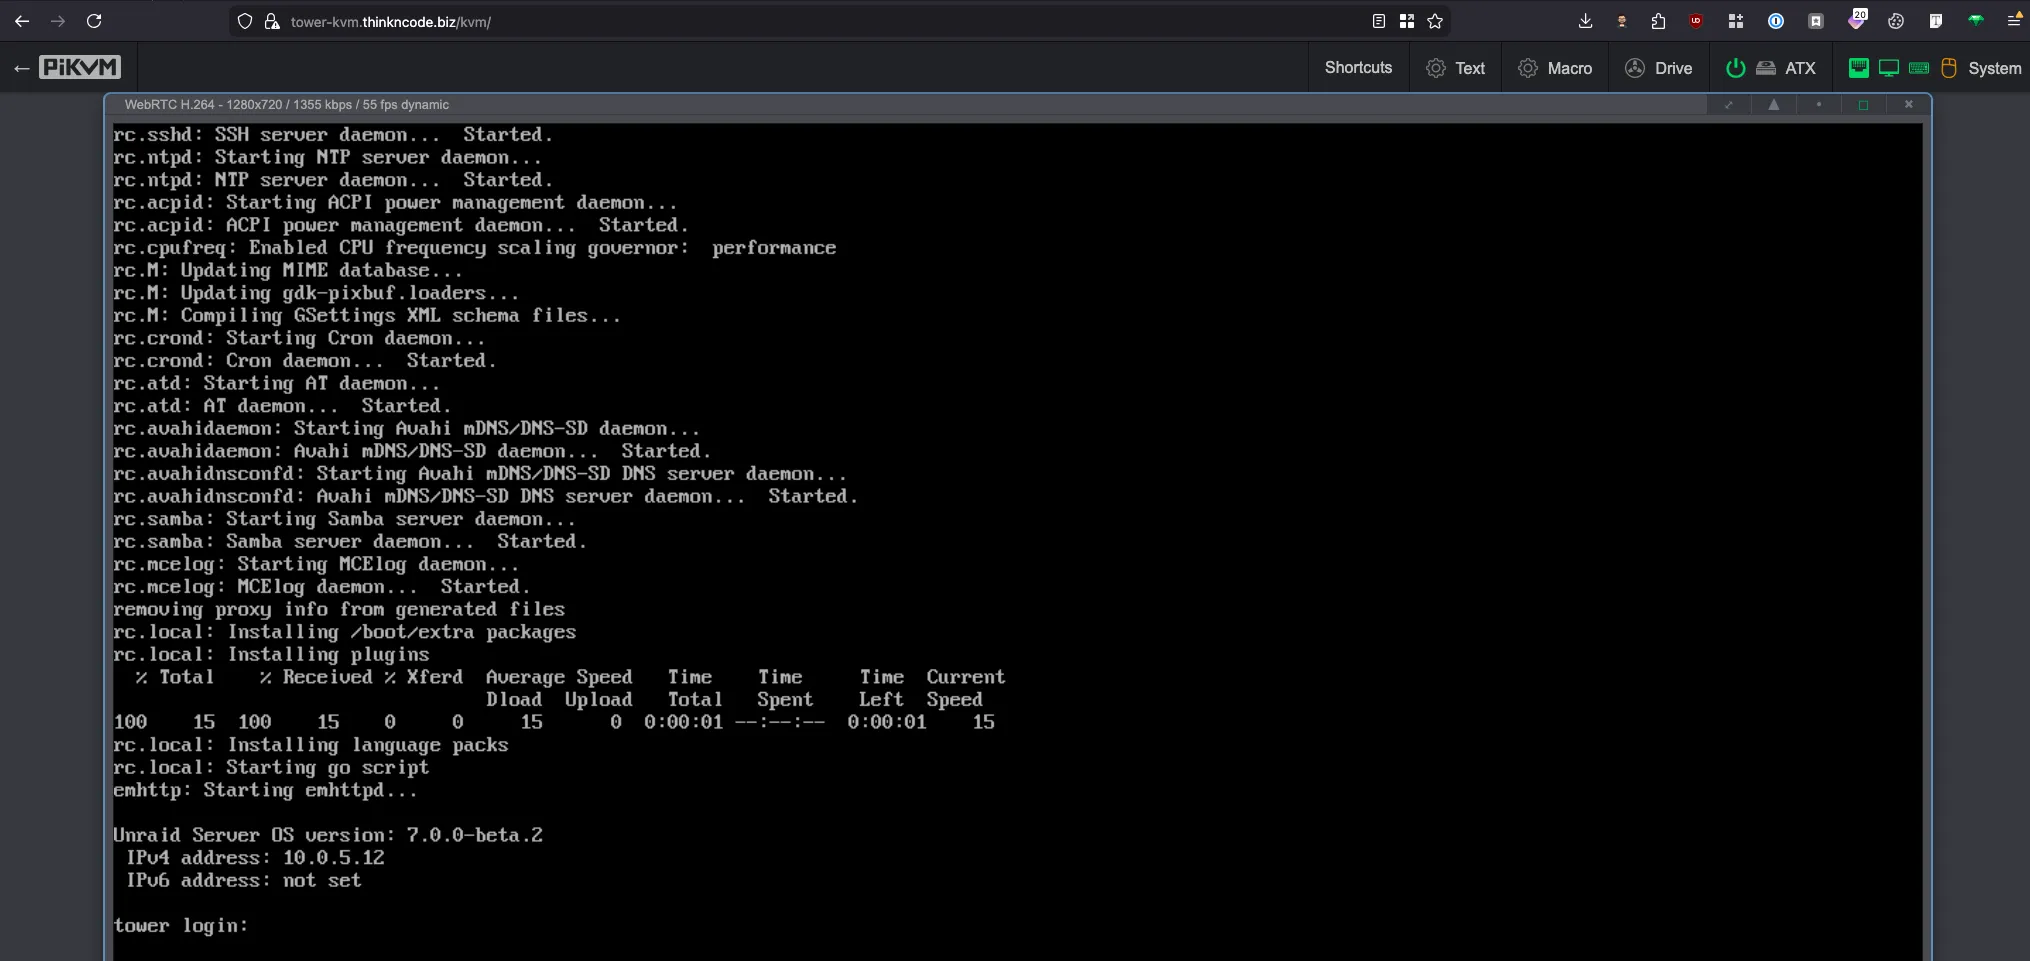
Unraid — Primary NAS & Docker Host#
Unraid is the main NAS and Docker host in my homelab. It does more work than any other machine—serving files, running containers, and hosting the Proxmox Backup Server (PBS) VM.
| Component | Specification |
|---|---|
| OS | Unraid |
| CPU | Intel i5-8600K (6c/6T) |
| RAM | 32 GB |
| Storage | 2x 4TB Seagate IronWolf + 1TB Seagate Barracuda + 370GB Cache SSD |
File sharing: NFS and SMB shares are exported to all Proxmox nodes. These are mounted for VM disk storage and to share data across the cluster.
Proxmox Backup Server (PBS): PBS runs as a dedicated VM on Unraid. All Proxmox nodes back up their VMs and containers here. Hosting PBS on Unraid means backup storage benefits from Unraid’s parity protection.
Docker containers: Unraid also runs several containers through Community Apps, including Immich for photo management. I’ll cover the full list of running services in Part 2.
Primary backup data store: Unraid stores the first copy of most of my homelab data, with TrueNAS and Synology maintaining secondary, offsite backups.
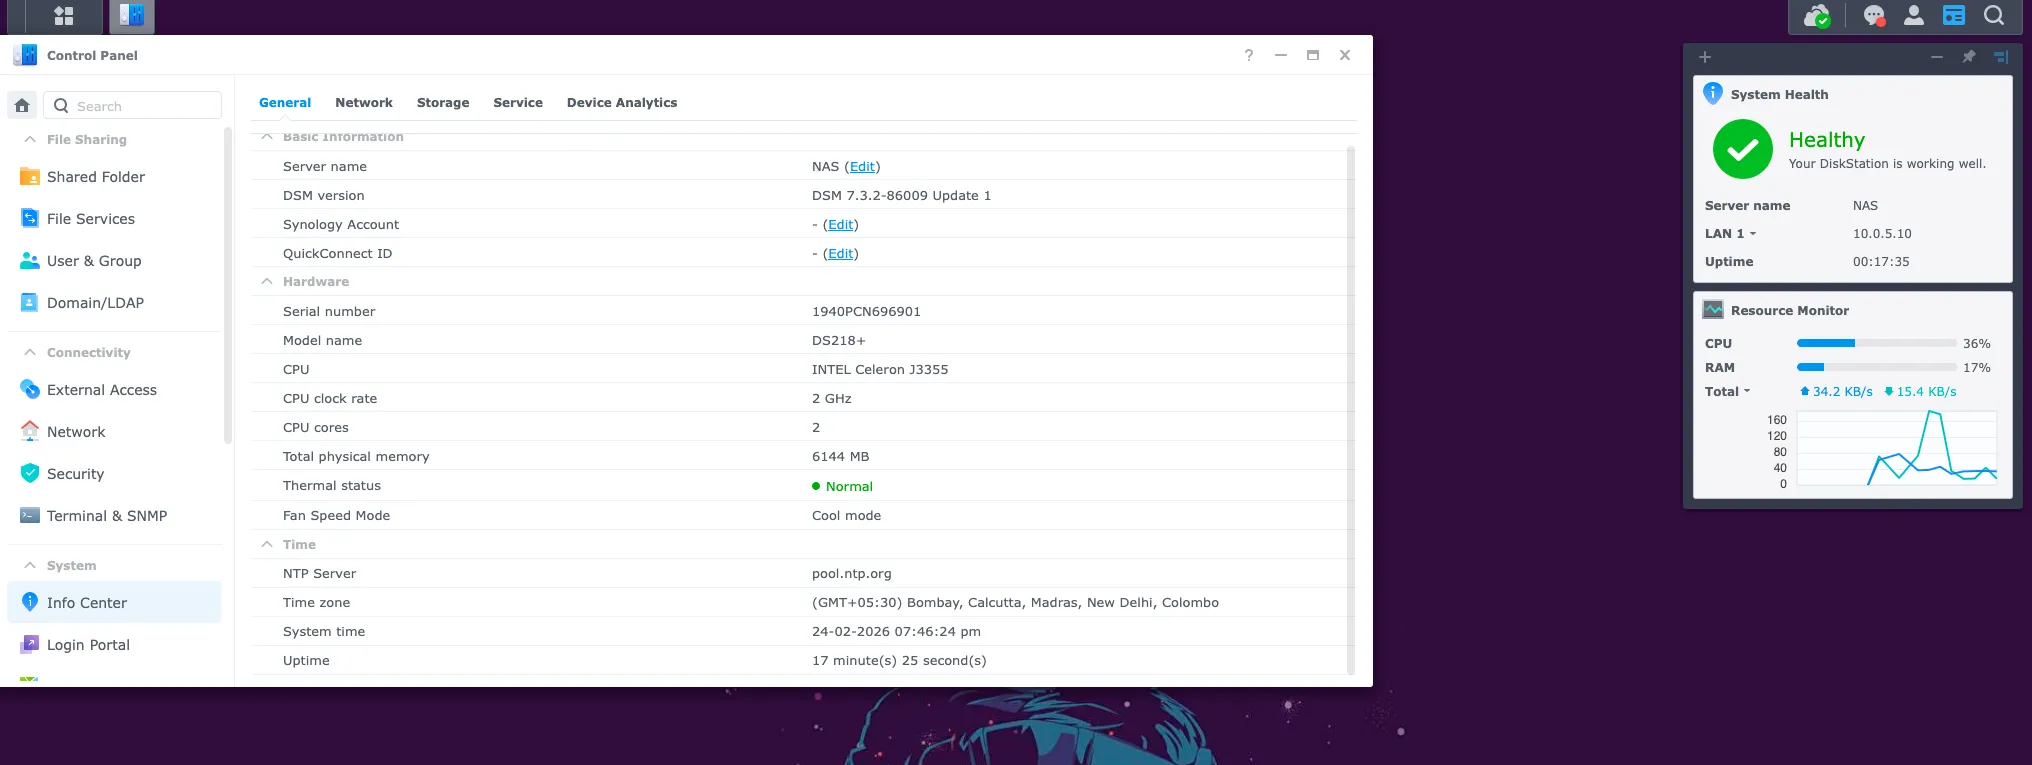
Synology DS18+ — Offsite Backup#
The Synology DS18+ serves as one of my two secondary backup targets. Data from Unraid and the Proxmox cluster is replicated here as a second copy, separate from primary storage.
| Component | Specification |
|---|---|
| Model | Synology DS18+ |
| CPU | Intel Celeron |
| RAM | 6 GB |
| Storage | 2x 4TB Seagate IronWolf (~8TB) |
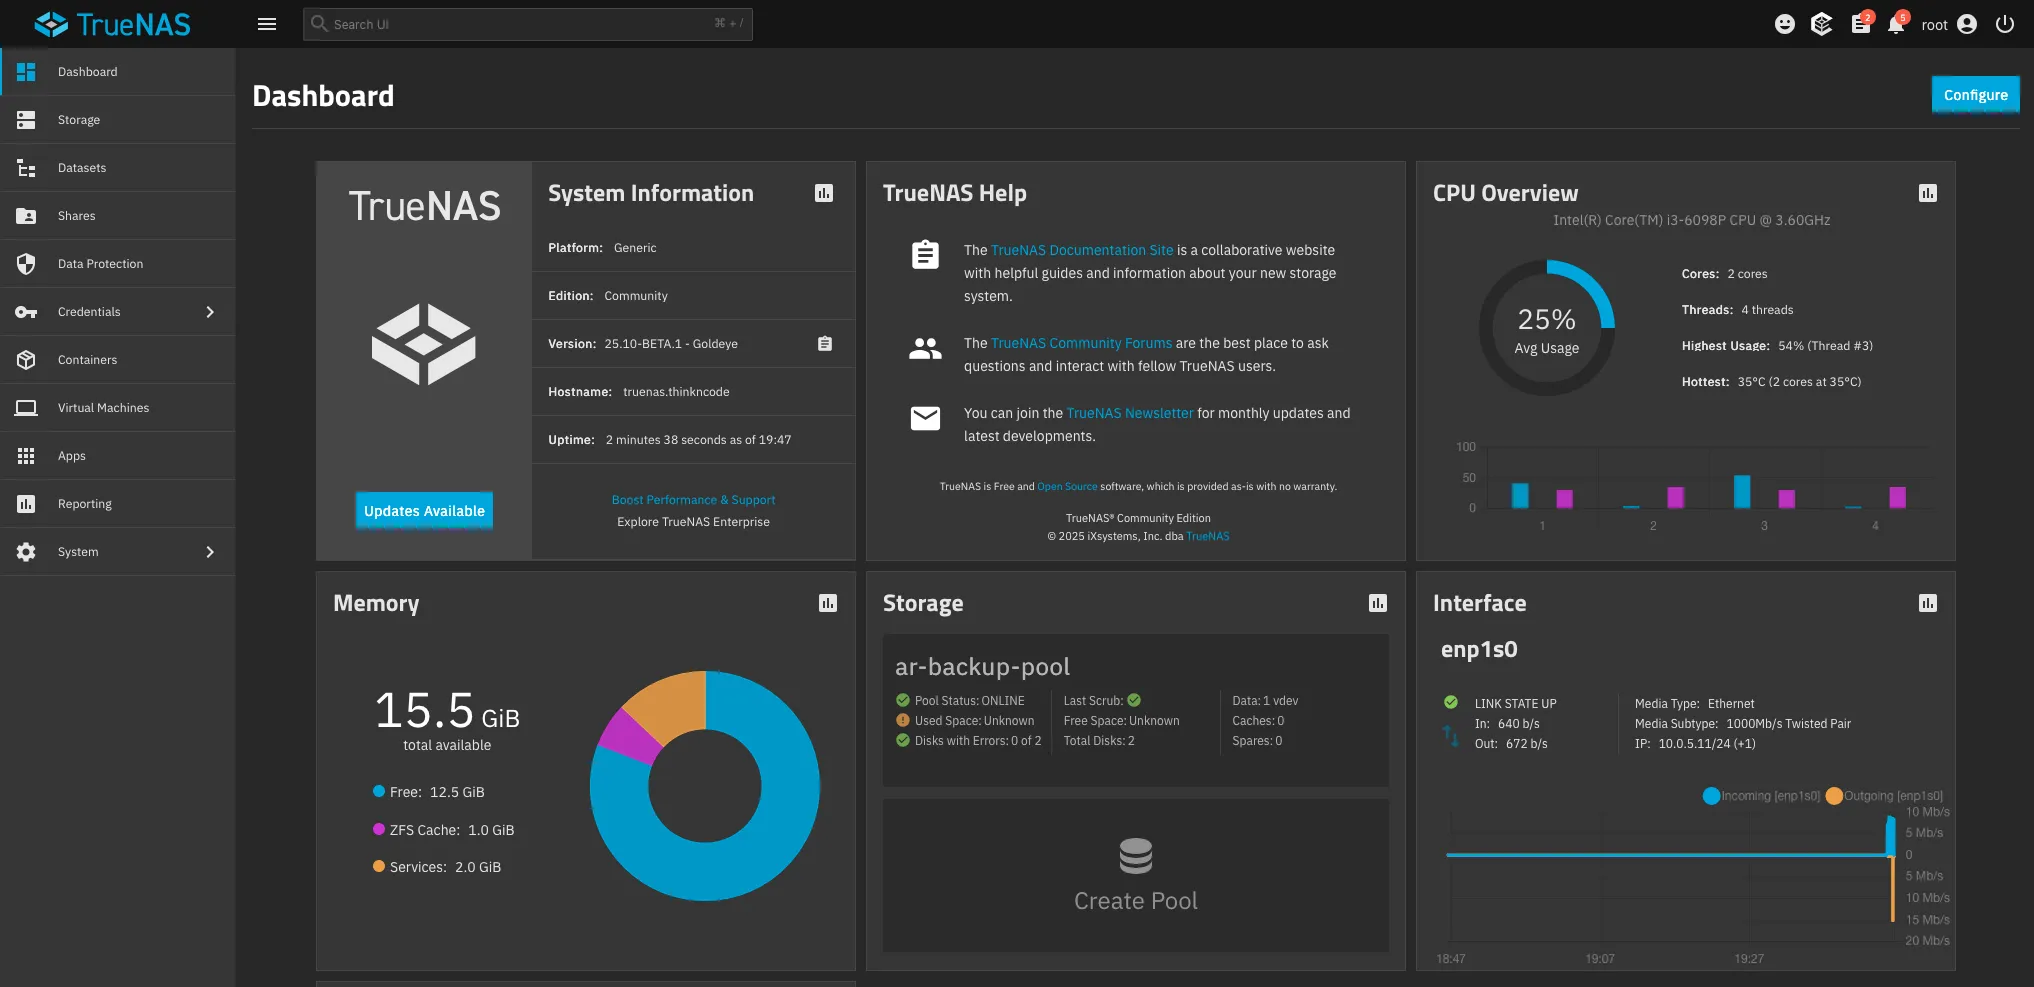
TrueNAS — Offsite Backup#
TrueNAS (running bare metal) is my other offsite backup target, primarily used for ZFS-native replication. With 16GB of RAM, it’s well-suited for ZFS ARC and runs efficiently even under replication load.
| Component | Specification |
|---|---|
| CPU | Intel i3-6100 (2 cores, 4 threads) |
| RAM | 16 GB |
| Storage | 2x 4TB Seagate IronWolf (ZFS pool) + 120GB OS SSD |
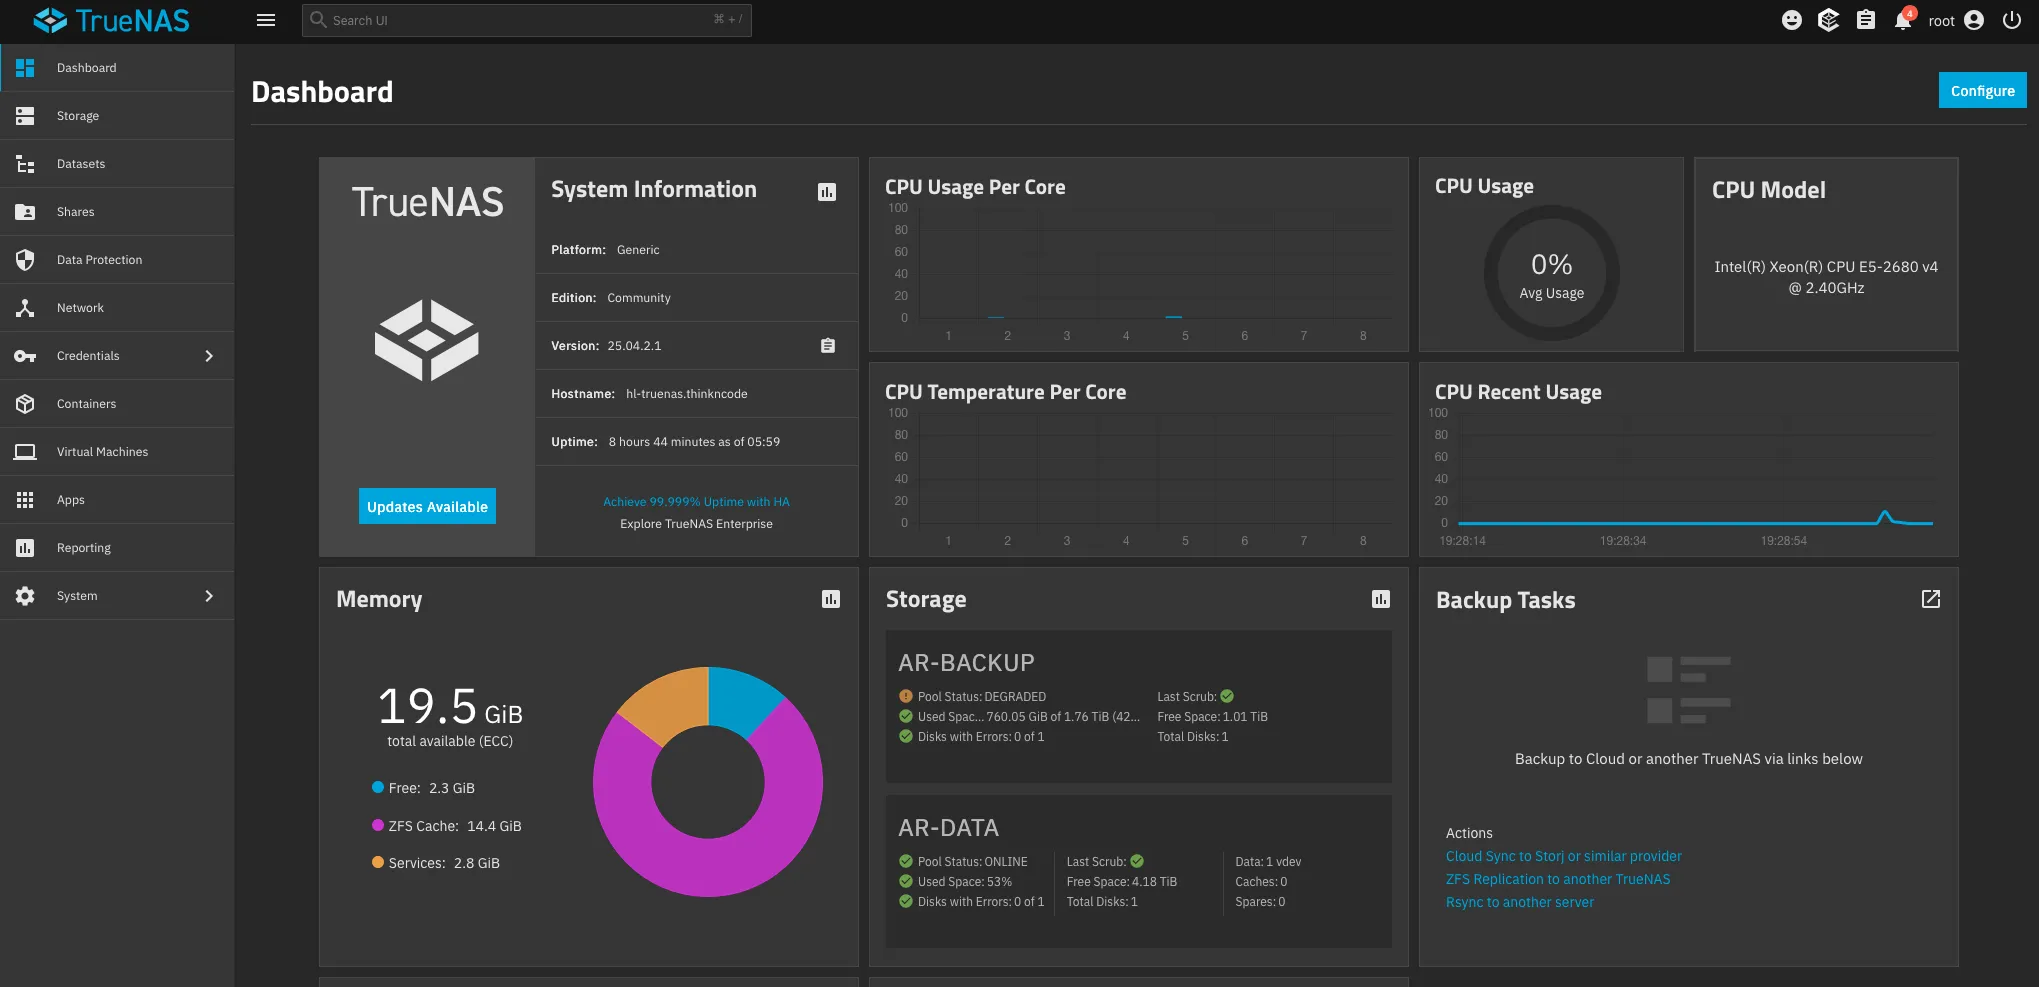
HL-TrueNAS — Bulk VM Storage (on pve3)#
HL-TrueNAS is a TrueNAS instance running as a VM on pve3 (Lenovo P510, Xeon E5-2680v4). The drives are passed directly to the VM, giving TrueNAS full control over the disks, while the host manages everything else.
| Component | Specification |
|---|---|
| Host | pve3 — Lenovo P510 (Xeon E5-2680v4, 48GB RAM) |
| Type | Proxmox VM with disk passthrough |
| vCPU | 8 cores |
| RAM | 20 GB |
| Storage | 10TB WD UltraStar + 2TB Seagate Barracuda + 50GB OS disk |
The 10TB WD UltraStar is the largest single drive in the lab. This VM serves as the high-capacity bulk storage pool — the place for large datasets, archives, and anything that needs a lot of space but not necessarily high performance.
Management#
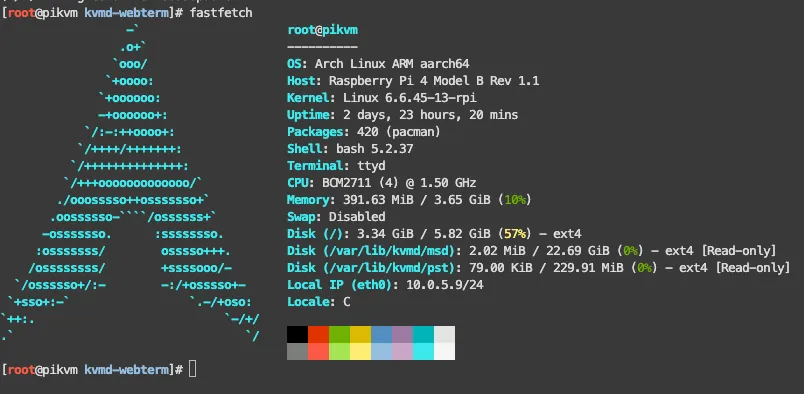
PiKVM — Out-of-Band Access#
I use two PiKVM units for out-of-band access to my most critical machines. This setup gives me BIOS-level control without needing to be physically present.
| Unit | Hardware | Manages | Form Factor |
|---|---|---|---|
| Geekworm KVM-A3 | Raspberry Pi 4 | Unraid | External HAT |
| Geekworm X651 | Raspberry Pi CM4 | pve1 | PCIe card (inside the case) |

NixOS Workstation — Admin Station#
My Dell Optiplex runs NixOS and sits on the homelab LAN segment (10.0.5.0/24), wired directly to one of the switches for maximum reliability.
| Component | Specification |
|---|---|
| Device | Dell Optiplex |
| OS | NixOS |
| CPU | Intel i3 (8th gen) |
| RAM | 16 GB |
| Storage | 250 GB |
Power Protection: APC UPS#
I use two UPS units to protect different layers of my infrastructure. Each is chosen based on how critical the devices are and how much power they draw.
APC UPS PRO 1000VA — Network & Management Tier#
This UPS protects the devices that absolutely need to stay up during an outage. If the network goes down, nothing else matters.
| Protected Device | Role |
|---|---|
| UDM SE | Gateway / edge router |
| pfSense (G1 Thin Client) | Firewall / homelab router |
| Netgear R7800 | WiFi router |
| Netgear GS308P (PoE) | PoE switch |
| TP-Link SG108E | Smart switch |
| Netgear GS308T | Managed switch |
| PiKVM x 2 | Remote management |
APC UPS PRO 1500VA — Compute & Storage Tier#
This UPS protects the heavy hitters—the servers and storage that take longer to shut down gracefully.
| Protected Devices | Role |
|---|---|
| pve - pve6 (7x Proxmox nodes) | Virtualization compute |
| Unraid (Custom, i5-8600K) | Primary NAS |
| Synology DS18+ | Backup NAS |
| TrueNAS (Custom, i3-6100) | ZFS NAS |
What’s Next#
This is Part 1 of a three-part series on my 2026 homelab architecture:
- Part 1: The Infrastructure (you are here) — network, compute, storage, remote management, and power
- Part 2: Services & Apps — every VM, LXC, and container across all nodes
- Part 3: Operations & Plans — backup strategy, observability stack, deployment automation, and 2026 roadmap